One of the videos that I’ve made here that has received the most engagement is called You Can’t Draw. I Don’t Believe You. Within that video, I outline my overall approach to drawing for note-taking purposes. I was intentionally blunt and minimal in my description, and I stand by the approach that I share there. But now I think it’s time to expand on it a bit — to give a fuller exploration of how you, as a sketchnoter, can develop your drawing skills in order to use those skills with more confidence while taking notes.
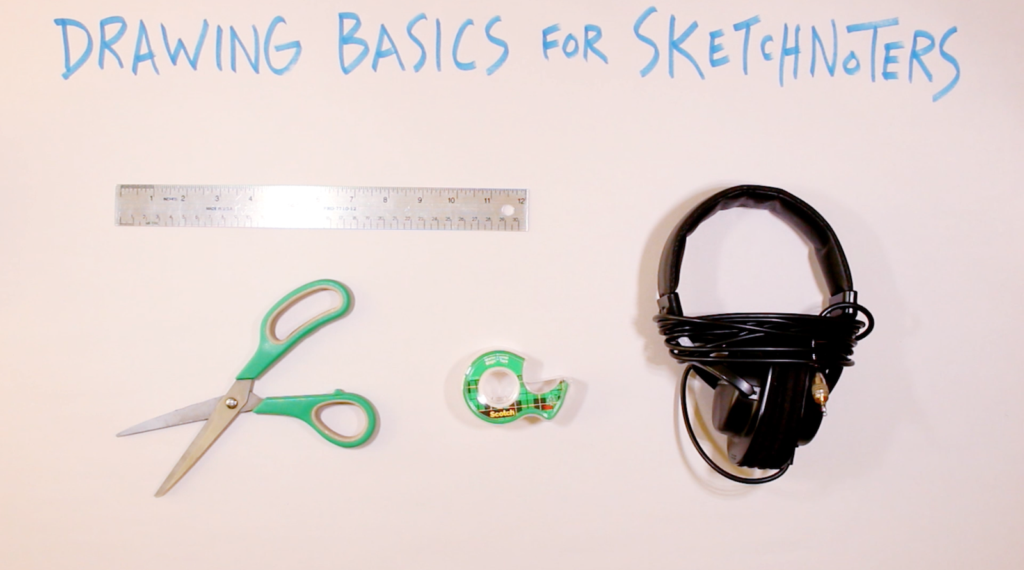
Throughout the rest of this article, I’ll be bringing in four objects as the things to draw: a ruler, some scissors, a roll of Scotch tape, and some headphones. As you can see, we’ve got a range of complexity here, so you’ll get to see how to draw simple objects as well as those that are a bit more complicated.
Three Types of Lines
When it comes to drawing objects within your sketchnotes, I think it’s helpful to break up that drawing into three distinct line types: essential lines, curvature lines, and accent lines. We’re going to go through each of those one by one for each of the objects.
Essential Lines
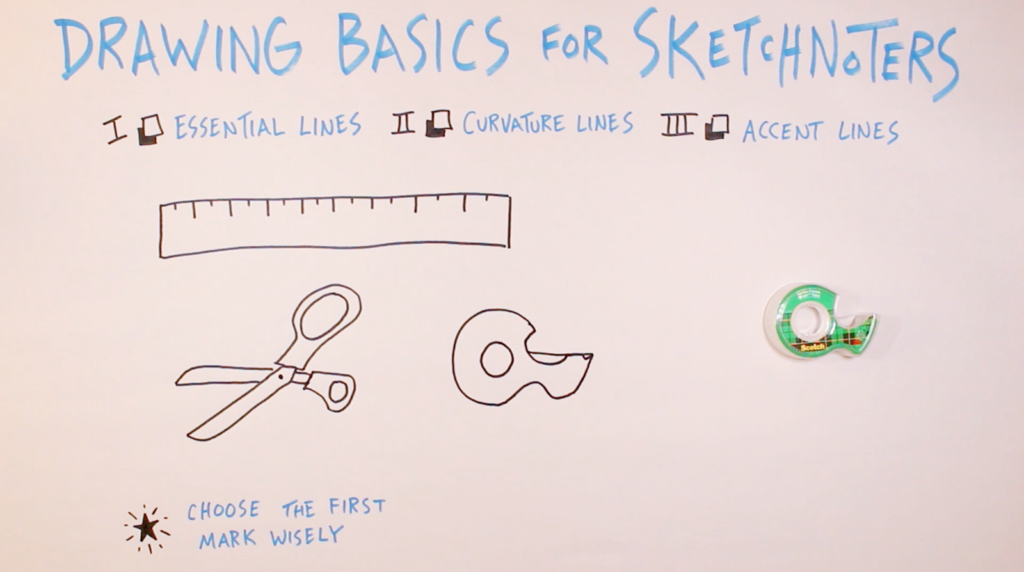
Essential lines are the minimum number of marks required to create a recognizable object on the page. I use the term essential because these are the only ones that you have to draw. You can skip curvature lines and accent lines if you want, but you can’t skip the essential lines. So as we look at each of these four objects, our goal will be to identify what parts of those objects are the lines that we must draw in order to create a recognizable representation of that object on the page.
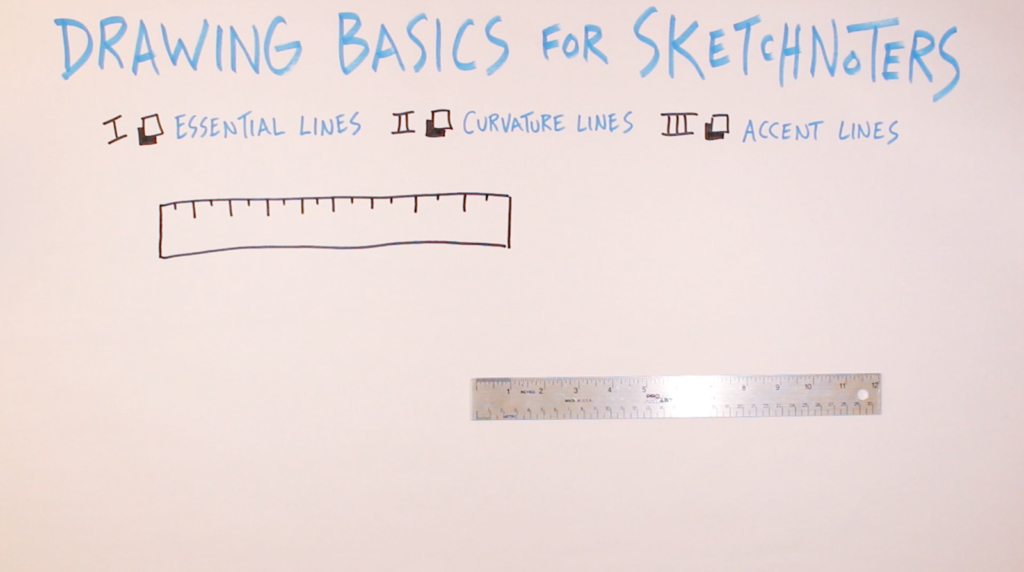
Ruler. For the ruler, that’s pretty simple. Just make a rectangle that’s got roughly the same proportions as the real thing. The hole at one end isn’t essential in my mind, so I’m not going to worry about that. But adding some measurement marks is — that’s what turns this from a random rectangle into a ruler. I don’t even think it’s necessary to get the right number of marks. Anywhere in the ballpark will do. For rulers, I like adding inch lines as well as smaller half-inch lines. I think those half-inch marks make it just a bit more clear what the object is, so that the brain can recognize it as a ruler just a tiny bit faster than it might without those marks.
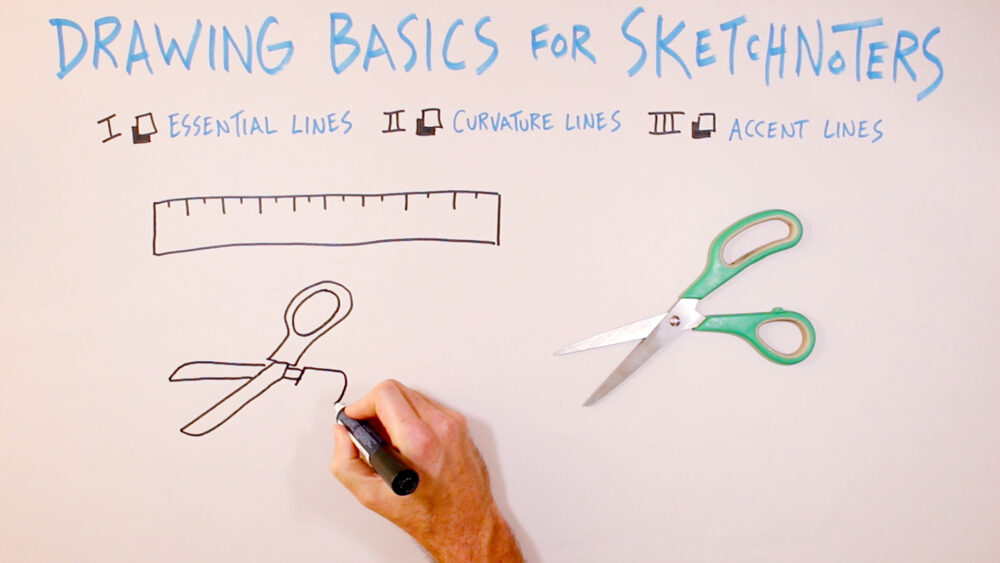
Scissors. With the scissors, we’ve got a more complicated shape. On this one, I think it’s helpful to focus on one half of the scissors at a time. We’ve got the straight edge of one cutting blade, and then we swing back to complete that metal part. Then we’ve got the handle — I’ll start with the outer line, going with roughly accurate proportions (no need to be exact), then the inner line to make sure we’ve got that gap for the fingers.
Then we take care of the other blade, starting again with the straight edge, looping back, going behind the first blade, and then tackling the handle again, noting that this one needs to be a bit smaller and more circular for the thumb. Finally, the screw adds a final touch — like the half-inch marks on the ruler — that helps to show right away that this thing here is a pair of scissors.
When drawing those scissors, I chose the first mark — that straight edge of the first blade — intentionally. Drawing that line created the most helpful reference point to then get all of the following marks down. I think that’s worth paying attention to: the first line of an object that you draw. Try to pick the line that will be most helpful when completing the rest of the object.
Roll of Scotch Tape. In the case of the roll of Scotch tape, I think that the most helpful first line is the circle. That reference then makes it easier to complete the outline — first following that circle and then pulling away from it. For this object, the sharp angle at the outer edge is helpful to show where the teeth are (the primary function of the plastic part of this object — to cut the tape). For the tape itself, a simple line will do.
Headphones. Finally, our most complex object here: the headphones. For this one, I’m going to cheat. I’m not going to draw this object exactly as you see it. Instead, I’m going to simplify it so that it’s easier to draw. One of those simplifications is that I’m not going to draw the cord wrapped around the headphones — instead, I’ll have it looping off to the side. I also separated the ear pieces a bit to imply the space where your head goes when you’re using this object. And as you can see, I didn’t draw all of the individual components. I skipped over some of the moving parts. Instead, I focused just on the puffy parts that rest on the ears, the plastic back to those, and then the connecting support that rests on your head.
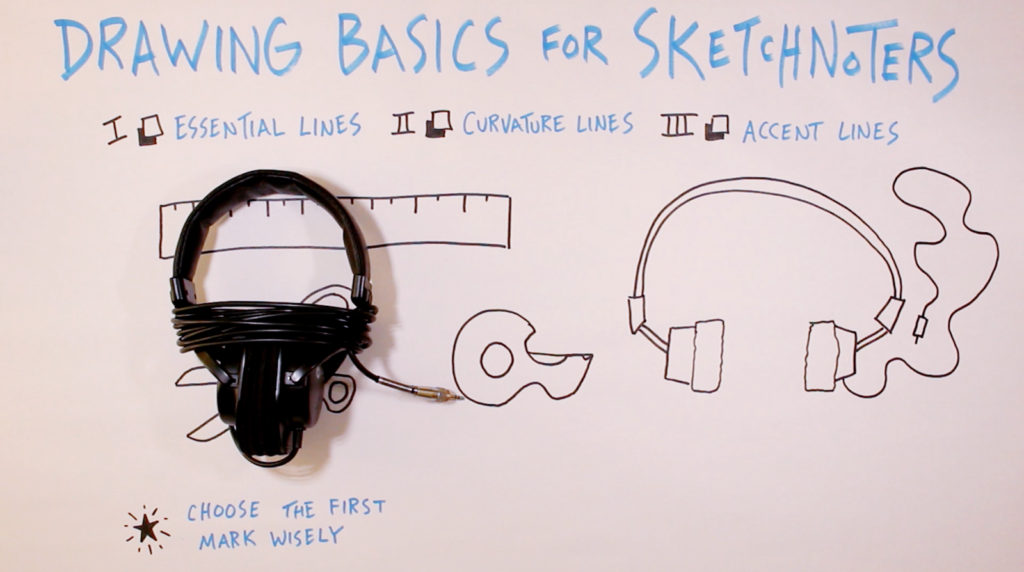
This is an example where you don’t need to include all of the details of the object in order to create something on the page that’s recognizable. Simplify it in order to make it easier and quicker to draw, and also to make it less cluttered. If I had tried to draw this realistically, exactly how it looks, there would be a lot of black lines on the page, and it wouldn’t necessarily be any more recognizable than the simple line drawing that I’ve created.
So there we have it for part one. We’ve drawn all of the essential lines for our four objects. That was by far the most difficult step, and we could stop here if we wanted. At this point, all of these objects are clearly recognizable. But you might want to add a touch more detail and a bit more nuance. That’s where the curvature lines and accent lines come in.
Curvature Lines
With curvature lines, what you’re doing is adding a bit of three-dimensionality to your objects. It gives them a sense of depth that they’re missing without it.
Ruler. Since our ruler has no curves and is essentially two-dimensional, there’s no need to add any curvature lines.
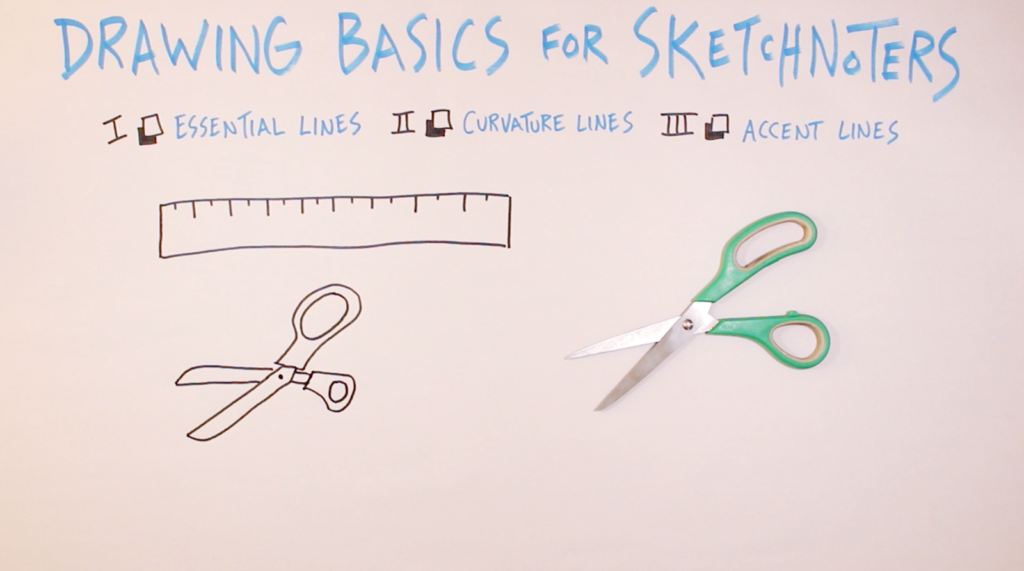
Scissors. With our scissors, I think it’s helpful to add one curvature line to each of the handles. Notice how those single curved lines give each of those handles a bit more weight. They pop off of the page in a way that they didn’t before.
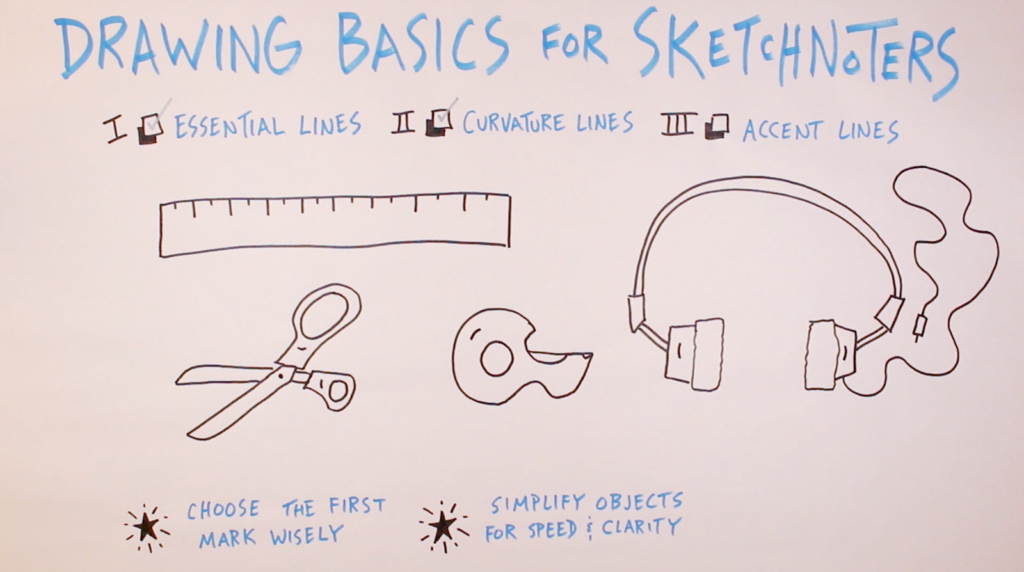
Roll of Scotch Tape. For the roll of tape, adding a curvature line somewhere around the inner circle helps to clarify what is whitespace and what is not. It makes it a little bit easier to see the plastic frame and the circular hole in the middle of it.
Headphones. With our headphones, I think adding curvature lines to the plastic backing behind the ear pieces is most helpful. You could put them on the cushioned ear pieces themselves, but I think keeping those blank helps to represent their softness compared to the plastic’s curved rigidity.
And as you look at all four drawings again, I think it shows that just a few curvature lines can go a long way.
Accent Lines
I’m using the term accent line as a kind of catchall to represent things like motion, light, sound, or impact.
Ruler. With our ruler, I don’t think accent marks are needed — unless you want to represent someone throwing it.
Scissors. For our scissors, though, if we want to represent the action of cutting paper, we can add some motion lines to the two blades on the opposite side of the direction that they’re moving. I tend to use sets of three lines to represent motion, with the center line a bit longer than the other two.
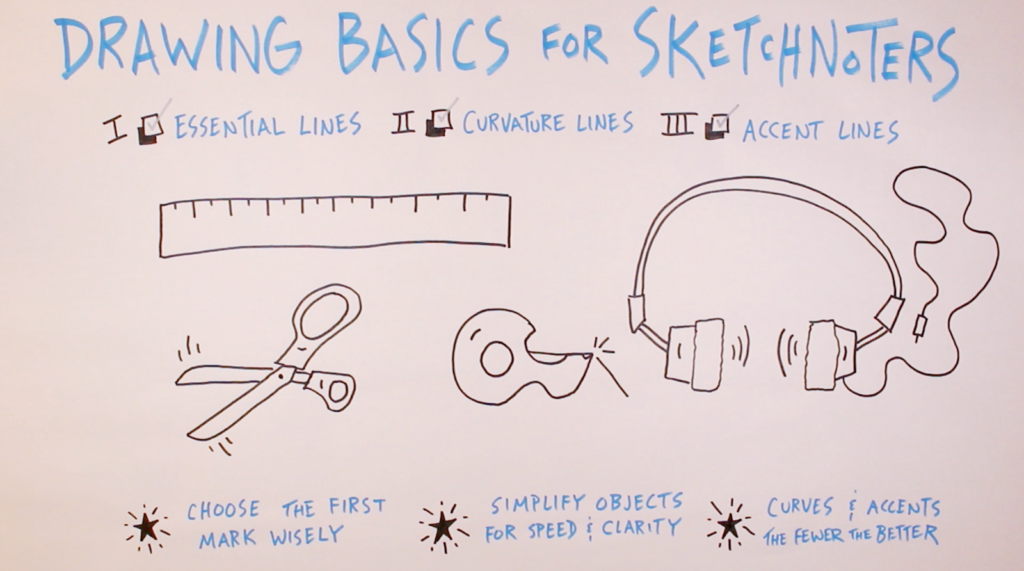
Roll of Scotch Tape. With our roll of tape, there’s not much going on right now. But if we wanted to show a strip of tape being ripped off, we could add a new line for that piece of tape at a downward angle (because that’s what it would look like if you were actually doing it), and then a few accent lines at the place where the tape is cut.
Headphones. Moving on to our headphones, we might want to show sound coming out of them. For sound, I again use three lines, but this time radiating outward, each one a bit longer than the last, to represent the sound waves coming from the headphones.
Less Is More
As with curvature lines, I tend to take the approach of the fewer, the better with accent lines. There’s no need to clutter your drawing. You want to leave room for words and other drawings to live around these objects, and you don’t want to burden the viewer of your sketchnotes — even if that viewer is just you in the future — with unnecessary detail.
Sketchnotes, after all, are about synthesizing information into a visual form that’s quickly recognizable and easy to interpret. That’s what these line drawings here are all about: making the fewest number of marks to get across the point that you’re trying to make, the object that you’re trying to represent, the story that you’re trying to tell.
I hope that the breakdown and the examples that I’ve given here help you to create these types of visuals in your notes, to fulfill whatever purpose you want those notes to serve.
Try It Yourself
I now encourage you to try this out on your own. Look for a few objects in your immediate environment to draw, and try putting into practice the principles that I’ve outlined here.
And if you’d like a bit more support in your visual note-taking efforts, check out our library of courses.
Good luck developing your drawing skills, and I’ll see you again next time!
Cheers,
-Doug